Vue造轮子常用方法
安装脚手脚
全局安装vue-cli
npm install -g @vue/cli
// or
yarn global add @vue/cli

// 安装之后就可以vue --version
- 生成脚手架:vue create demo or vue ui (使用图形化界面创建)
- 进入脚手架并安装:yarn add element-ui axios
- 关闭console:npm install terser-webpack-plugin -D
- 开启gzip压缩:npm install compression-webpack-plugin -D
配置main.js
import Vue from 'vue'
import App from './App.vue'
import router from './router'
import store from './store'
import axios from 'axios'
import ElementUI from 'element-ui'
import 'element-ui/lib/theme-chalk/index.css'

Vue.use(ElementUI)
Vue.config.productionTip = false

new Vue({
    router,
    store,
    render: h => h(App)
}).$mount('#app')
ctrl+s格式化代码
将以下代码配置到vscode里,或者给单独项目放置:
在项目根目录创建.vscode/settings.json里;
需要的插件,在vscode添加:vetur、eslint
{
  "vetur.format.defaultFormatter.html": "prettier",
  "vetur.format.defaultFormatter.js": "prettier",
  "vetur.format.defaultFormatterOptions": {
    "prettier": {
      "semi": false,
      "singleQuote": true,
      "bracketSpacing": true,
      "eslintIntegration": true
    }
  },
  "eslint.validate": [
    "javascript",
    "javascriptreact",
    {
      "language": "vue",
      "autoFix": true
    }
  ],
  "eslint.autoFixOnSave": true
}
目录结构
- dist
- src
- api 接口请求
- assets 静态资源
- components 组件
- router 路由
- styles 样式
- views 页面单文件
- store 状态管理
- utils 公共方法
- config 全局配置
配置vue.config.js
let path = require('path')
const resolve = dir => path.join(__dirname,dir) // 设置绝对路径;
const env = process.env.NODE_ENV

module.exports = {
    publicPath: '/', // 部署路径 以当前目录
    outputDir: 'dist', // 输出文件目录(默认值dist)
    lintOnSave: 'warning', // eslint是否在保存的时候检查, eslint出错不会导致编译失败
    chainWebpack: config => {
        // 配置别名
        config.resolve.alias
            .set('components',resolve('@/components'))
            .set('assets',resolve('@/assets'))
            .set('api',resolve('@/api'))
    },
    configureWebpack: config => {
        config.devtool = '#eval-source-map' // 开启debugger调试
        if(env === 'production'){
            // 为生产环境修改配置...
            config.mode = 'production'
            // 生产环境关闭console
            config.optimization.minimizer[0].options.terserOptions.compress.drop_console = true;
            // 配置gzip压缩
            return {
                plugins: [new CompressionPlugin({
                    test: /\.js$|\.html$|\.css/, // 匹配文件名
                    threshold: 10240,  // 对超过10k的数据进行压缩
                    deleteOriginalAssets: false // 是否删除原文件
                })]
            }
        } else {
            // 为开发环境修改配置...
            config.mode = 'development'
        }
    },
    productionSourceMap: false, // 生产环境是否生成sourceMap 文件,false提高构建速度
    devServer: {
        host: '0.0.0.0', // 允许外部ip访问
        port: 8022, // 端口
        overlay: {
            warnings: true,
            errors: true
        },
        proxy: {
            '/api' : {
                target: 'http://www.baidu.com/api',
                changeOrigin: true, //允许websockets跨域
                pathRewrite: {'^/api': ''}
            }
        }
    },
    // 第三方插件配置
    pluginOptions: {}
}
sourceMap介绍
是一个.map的文件,里面储存着位置信息,这个文件里保存的是转换后代码的位置,和对应的转换前的位置,有了它,出错的时候通过断点工具可以直接显示原始代码,而不是转换后的代码;
每个js文件对应一个.map文件,里面的基本信息如下
{
    version : 3, //SourceMap的版本,目前为3
    sources: ["foo.js", "bar.js"], //转换前的文件,该项是一个数组,表示可能存在多个文件合并
    names: ["src", "maps", "are", "fun"], //转换前的所有变量名和属性名
    mappings: "AACvB,gBAAgB,EAAE;AAClB;", //记录位置信息的字符串
    file: "out.js", //转换后的文件名
    sourcesContent: " \t// The module cache\n", //转换后的代码
    sourceRoot : "" //转换前的文件所在的目录。如果与转换前的文件在同一目录,该项为空
}
配置请求拦截器
创建src/api/index
import axios from 'axios'
import Vue from 'vue'
import { Loading, Message } from 'element-ui' // 请求loading可以自已更换

// 新建一个实例, 避免全局axios被污染;
// 如果这里不是create创建的axios, 当axios被添加一次路由拦截器之后, 项目任意地方再次引入axios, 会同样使用该拦截器;
const service = axios.create({
    timeout: 10000, // 超时
    withCredentials: true, // 允许cookie跨域
    baseURL: '', // 配置请求host
})

let loading = null
// 配置请求
service.interceptors.request.use(
    config => {
        loading = Loading.service({text: '正在加载中....'})
        config.headers.Authorization = localStorage['token'] // 给请求添加token
        return config
    },
    error => Promise.reject(error)
)
// 配置响应
service.interceptors.response.use(
    response => {
        if(loading) loading.close()
        // ... 在这里处理统一code问题
        return response.data
    },
    error => {
        if(loading) loading.close()
        if(!error.response){
            if(error.message.includes('timeout')){
                Message.error('请求超时, 请检查网络是否连接正常')
            } else {
                Message.error('请求失败,请检查网络是否已连接')
            }
            return
        }
        return Promise.reject(error)
    }
)

// 切换页面时候,取消上个页面的请求的方法,需要则打开
// Vue.$httpRequestList = []
// const cancelToken = () => {
//   return new axios.CancelToken(cancel => {
//     // cancel就是取消请求的方法
//     Vue.$httpRequestList.push({
//       cancel
//     })
//   })
// }

export const getData = (url, data={}, method='get', headers) => {
    let config = {
        url,
        method: method.toLowerCase(),
        // cancelToken: cancelToken(),
        headers
    }
    if(method.toLowerCase() === 'get' || method === 'delete') {
        // 处理get请求防止IE缓存
        if(!!window.ActiveXObject || 'ActiveXObject' in window) {
            data.t = new Date().getTime()
        }
        // 处理get请求的传参方式, get参数需要放在params下
        config.params = data
    } else {
        config.data = data
    }
    return service(config)
}
调接口方法,在api创建一个js文件,针对某个页面创建,如login.js
import {getData} from './index'
export const login = data =>
  getData('/auth/login', data, 'post')
如果需要配置取消拦截器:在路由文件里面处理接口请求
// 路由切换检测是否强行中断
router.beforeEach((to, from, next) => {
  if (Vue.$httpRequestList && Vue.$httpRequestList.length > 0) {
    Vue.$httpRequestList.forEach(request => {
      // 取消没有响应的请求
      request.cancel()
    })
    // 请求取消响应的数据
    Vue.$httpRequestList = []
  }
})
在组件里面引入该请求的方法,直接调用传入参数即可
import { login } from 'api/login'
export default {
    name: 'login',
    method: {
        async submit(){
            let res = await login()
            if(res && res.data){
                // 处理成功之后的方法
            }
        }
    }
}
环境配置
创建config/index.js
// 填写对应的网址
const globals = {
    mock: 'test',
    host: {
        test: 'https://test.heny.vip',
        pre: 'https://pre.heny.vip',
        prod: 'https://prod.heny.vip',
        uat: 'https://uat.heny.vip'
    },
    // 在下面也可以写其他的全局配置
}
export default globals
创建utils/common.js,里面放公共的方法
import Cookies from 'js-cookie' // 用于存token的cookie
import {globals} from '../globals'
/**
*    根据页面url, 返回对应的运行环境
*/
export const getCurrentEnv = function(){
    let {hostname} = window.location
    if(
        hostname.includes('localhost') ||
        hostname.includes('10.105') ||
        hostname.includes('192.168')
    ){
        return globals.mock
    }
}
export const getHost = function(){
    return globals.host[getCurrentEnv()]
}
在配置拦截路由里面引入common.js
import {getHost} from 'utils/common'
axios.defaults.baseURL = getHost()
开启gzip压缩
安装:npm install compression-webpack-plugin -D
配置vue.config.js
module.export = {
  configureWebpack: (config)=>{
    if(process.env.NODE_ENV === 'production'){
      return {
        plugins: [new CompressionPlugin({
            test: /\.js$|\.html$|\.css/, // 匹配文件名
            threshold: 10240,  // 对超过10k的数据进行压缩
            deleteOriginalAssets: false // 是否删除原文件
        })]
      }
    }
  }
}
要使服务器返回.gz文件,还需要对服务器进行配置,根据Request Headers的Accept-Encoding标签进行鉴别,如果支持gzip就返回.gz文件。
需要nginx配置,其实也可以不用配置,宝塔面板的nginx默认就已经配置好了
    #开启和关闭gzip模式
    gzip on;
    #gizp压缩起点,文件大于1k才进行压缩
    gzip_min_length 1k;
    # gzip 压缩级别,1-9,数字越大压缩的越好,也越占用CPU时间
    gzip_comp_level 6;
    # 进行压缩的文件类型。
    gzip_types text/plain application/javascript application/x-javascript text/css application/xml text/javascript ;
    #nginx对于静态文件的处理模块,开启后会寻找以.gz结尾的文件,直接返回,不会占用cpu进行压缩,如果找不到则不进行压缩
    gzip_static on
    # 是否在http header中添加Vary: Accept-Encoding,建议开启
    gzip_vary on;
    # 设置gzip压缩针对的HTTP协议版本
    gzip_http_version 1.1;
封装Vuex
创建目录结构:
store
 --modules
    --login.js
 --index.js
 --types.js
在store/index.js写入
import Vue from 'vue'
import Vuex from 'Vuex'
Vue.use(Vuex)
let modules = {}
let context = require.context('./modules', false, /\.js$/)
context.keys().forEach(item => {
    let name = /\.\/(.*?)\.js$/.exec(item)[0]
    modules[name] = context(item).default
})
export default new Vuex.Store({
    modules
})
配置好第二步之后就可以直接在modules里面创建单文件js了,不能再创建文件夹,因为不能找到里面的js文件,不能在自动引入了
modules里面的单文件js配置结构,和普通配置是一样的
import * as types from '../types'
const state = {}
const mutations = {}
const actions = {}
const getters = {}
export default {
    state,
    mutations,
    actions,
    getters
}
Vuex数据持久化
安装:npm i vuex-persistedstate
修改store
import createPersistedState from 'vuex-persistedstate'
const persistedStateOpt = {
    storage: window.localStorage
}
const store = new Vuex.Store({
    // ...
    plugins: [createPersistedState(persistedStateOpt)]
})
创建全局的scss变量
配置vue.config.js
module.exports = {
    css: {
        loaderOptions: {
            scss: {
                // 根据自己的路径设置
                prependData: `@import "@/styles/variable.scss";`
            }
        }
    }
}

// 如果上面的不行,将scss换成sass
sass: {
    data: `@import "@/styles/variable.scss";`
}
脚手架中使用全局过滤器
需要引入Vue,之后定制全局filter
import Vue from 'vue'
Vue.filter('money',val=>{
    return .....
});  // 需要返回;
// 在main.js里
import './filters'
全局Vue.directive
// 全局自定义
Vue.directive("change-color",function(el,binding,vnode){
  el.style["color"]= binding.value;
})
// 使用
<template>
<div v-change-color=“color”>{{message}}</div>
</template>
<script>
  export default{
    data(){
      return{
        color:'green'
      }
    }
  }
</script>
注册全局组件
- 创建:./components/global/index.js,并写入以下代码,之后在main.js引入:import './components/global'即可;
let requireAll = context => context.keys().map(context)
let context = require.context('./',false,/\.vue$/)
requireAll(context).forEach(({ default: item }) => {
  // 第一个小括号匹配文件夹名 第二个小括号匹配文件名
  let reg = /\/(\w+)\/(\w+).vue$/
  // 引入组件时, 默认取组件里面的name属性, 如果没有name属性则取文件名, 如果文件名是index则取文件夹名, 注册的全局组件以my-[name]使用;
  let name = item.name || item.__file.match(reg)
  Vue.component(`my-${name}`, item)
})
- 之后在global文件夹下面创建文件即可;
在使用vite搭建的项目时,不要使用require.context,而是使用该方法
const files = import.meta.globEager('../views/**/*.vue')
console.log(files) // {[path]: module}
路由懒加载
使用import可以懒加载
path: '/home',
name: 'home',
component: () => import('src/views/home')
修改懒加载引入的名字
使用webpackChunkName定义懒加载的名字
import(/* webpackChunkName: "home"*/ 'src/views/home')使用[request]变量,可以解决循环import的找不到名字
routes.forEach(route => {
    path: route.path,
    name: route.name,
    component: () => import(/* webpackChunkName: "[request]" */ `src/views/${route.filePath}`)
})
拆分路由
创建src/router/index.js文件
import Vue from 'vue'
import Router from 'vue-router'

Vue.use(Router)
let routes = []
const routerContext = require.context('./', true, /index\.js$/)
routerContext.keys().forEach(route =>{
    // 处理路由根目录的index.js
    if(route.startsWith('./index')) return
    const routerModule = routerContext(route)
    // 兼容import export 和 require module.export 两种规范
    routes = [...routes, ...(routerModule.default || routerModule)]
})

export default new Router({
    mode: 'history',
    base: process.env.BASE_URL,
    routes
})
之后在router文件夹下面以 下面的方式创建文件路由
// Home/index.js
export default [
    {
        path: '/home',
        name: 'Home',
        components: () => import('@/views/Home'),
        meta: {
            title: '' // 页面标题;
        }
    }
]
Vue路由 按需 keep-alive
测试方法,如果有keep-alive的路由;
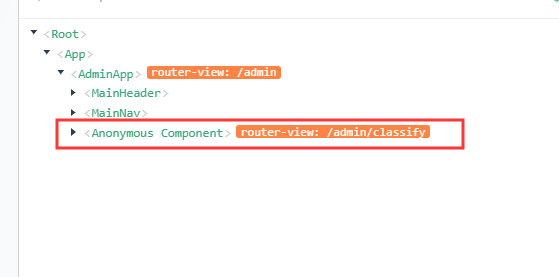
将需要缓存和不需要缓存的视图组件区分开
写2个router-view出口
<keep-alive>
    <!-- 需要缓存的视图组件 -->
    <router-view v-if='$route.meta.keepAlive'/>
</keep-alive>
<!-- 不需要缓存的视图组件 -->
<router-view v-if='!$route.meta.keepAlive'/>
在router里定义好需要缓存的视图组件,deepth是深度,比如,index是0.5,list是1,detail是2,层级关系;
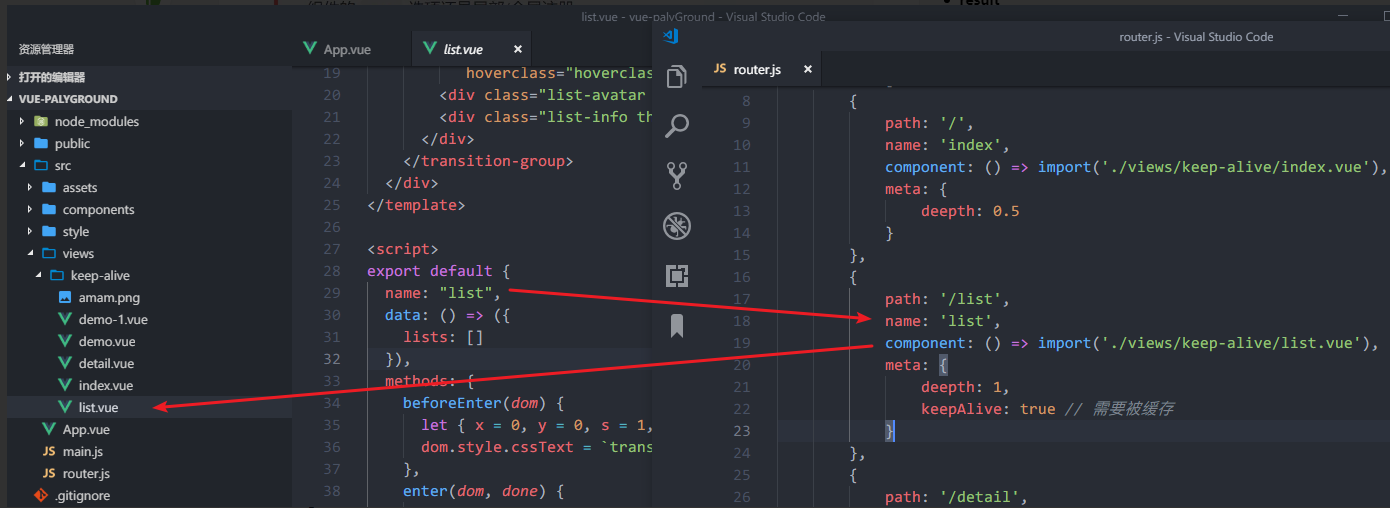
new Router({
    routes: [
        {
            path: '/',
            name: 'index',
            component: ()=>import('./views/keep-alive/index'),
            meta: { deepth: 0.5 } // 不需要缓存的直接不传入即可;
        },
        {
            path: '/list',
            name: 'list',
            component: ()=>import('./views/keep-alive/list'),
            meta: { keepAlive: true, deepth: 1 } // 需要缓存
        },
        {
            path: '/detail',
            name: 'detail',
            component: _ => import('./views/keep-alive/detail'),
            meta: { deepth: 2 } // 深度为2
        }
    ]
})
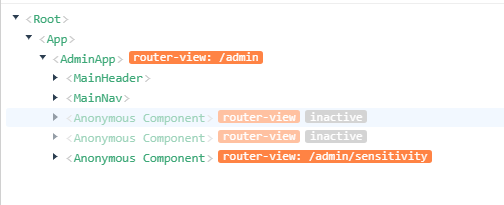
按需加载keep-alive,include属性是当包括相同name属性时才保留,当是返回的时候,则删除,从index到list页再到详情页
<template>
	<keep-alive :include="include">
    <!-- 需要缓存的视图组件 -->
      <router-view v-if="$route.meta.keepAlive" />
    </keep-alive>

    <!-- 不需要缓存的视图组件 -->
    <router-view v-if="!$route.meta.keepAlive" />
</template>
<script>
export default {
    name: 'app',
    data: _ => ({
        include: []
    }),
    watch: {
        $route(to,from){
            // 需要是缓存的组件
            if(to.meta.keepAlive){
                // include里面没有之后再push
                !this.include.includes(to.name) && this.include.push(to.name)
            }
            // 查看深度关系,如果是大于要去的页面,则删除上一个页面;
            if(to.meta.keepAlive && to.meta.deepth < from.meta.deepth){
                // 查询的是从哪里来的页面
                let index = this.include.indexOf(from.name)
                index !== -1 && this.include.splice(index, 1)
            }
        }
    }
}
</script>
注意:keep-alive要求被包裹到的组件都有自己的名字,上面push和splice的是router的name名字,建议把router的name名字和组件的name名字设成一样的;
Mixin
主要是解决逻辑复用的问题的
// news-mixin.js
export default {
    created(){
        console.log('mixin被插入了111')
    },
    methods(){
        add(){
            console.log('add函数被执行')
        }
    }
}
// 复用的逻辑都可以写在new-mixin里面使用;
// home.vue
import newMixin from './news-mixin'
export default {
    name: 'home',
    mixins: [newMixin]
}
模块html里面调用console
在main.js入口文件,绑定以下代码即可;
Vue.prototype.$log = window.console.log
// 之后就可以在html里面打印了
<template>
    <div>{{$log('this is message')}}</div>
</template>
配置svg
安装:npm i svg-sprite-loader
修改vue.config.js
const path = require('path')
const resolve = dir => path.resolve(__dirname, dir)
module.exports = {
    // ...
    chainWebpack: config => {
        // 解决默认svg不处理src/assets文件夹
        config.module
            .rule('svg')
            .exclude.add(resolve('src/assets'))
            .end()

        config.module
            .rule('icons')
            .test(/\.svg$/)
            .include.add(resolve('src/assets')) // 处理svg目录
            .end()
            .use('svg-sprite-loader')
            .loader('svg-sprite-loader')
            .options({
                symbolId: 'icon-[name]'
            })
    }
}
在components下新建SvgIcon.vue
<template>
  <svg :class="svgClass" aria-hidden="true">
    <use :xlink:href="iconName"/>
  </svg>
</template>

<script>
export default {
  name: 'SvgIcon',
  props: {
    name: {
      type: String,
      required: true
    },
    className: {
      type: String,
      default: ''
    }
  },
  computed: {
    iconName() {
      return `#icon-${this.name}`
    },
    svgClass() {
      if (this.className) {
        return 'svg-icon ' + this.className
      } else {
        return 'svg-icon'
      }
    }
  }
}
</script>

<style scoped>
.svg-icon {
  width: 1em;
  height: 1em;
  vertical-align: -0.15em;
  fill: currentColor;
  overflow: hidden;
}
</style>
在assets目录下新建index.js
import Vue from 'vue'
import SvgIcon from '@/components/SvgIcon'// svg组件

// register globally
Vue.component('svg-icon', SvgIcon)

const requireAll = requireContext => requireContext.keys().map(requireContext)
const req = require.context('./', true, /\.svg$/)
requireAll(req)
将assets/index.js引入到main.js
接下来将需要使用svg的图片放入到assets/icons下面即可,会自动注册
<template>
    <svg-icon name='文件名' />
</template>
配置postcss插件
在项目根目录创建postcss.config.js,postcss-pxtorem是自动转换rem;
配置样式官网教程: https://cli.vuejs.org/zh/guide/css.html
module.exports = {
    plugins: {
        autoprefixer: {},  // 浏览器自动前缀
        // 自动转rem布局的插件
        'postcss-pxtorem':{
            rootValue: 32, // 根大小
            propList: ['*'], // 属性选择器, *表示通用;
            selectorBlackList: ['weui','mu', 'no-'] // 忽略选择器, 正则匹配,选择器有数组的都不转换;
        }
    }
}
如果在创建项目时,没有选择postcss.config.js、babel、ESLint...单文件,选择了package.json,则需要在vue.config.js配置
module.exports = {
    css: {
        loaderOptions: {
            postcss: {
                plugins: [
                    require('postcss-pxtorem')({
                        rootValue: 32,
                        .....
                    }),
                    .....其他的插件;
                ]
            }
        }
    }
}
配置mock
安装mock:
npm i mockjs mocker-api -S对修改vue.config.js:
var webpack = require('webpack')
var apiMocker = require('mocker-api')
module.exports = {
    devServer: {
        before(app) {
            apiMocker(app, path.resolve(__dirname, './mock/index.js'), {
                proxy: {}, // 需要设置代理的话
                changeHost: true,
            })
        }
    }
}
在项目根目录创建mock/index.js
module.exports = {
  // 支持值为 Object 和 Array
  'GET /api/users': { users: [1, 2] },
  // GET 可忽略
  '/api/users/1': { id: 1 },
  // 支持自定义函数,API 参考 express@4
  'POST /api/users/create': (req, res) => {
    // 添加跨域请求头
    res.setHeader('Access-Control-Allow-Origin', '*');
    res.end('ok');
  },
}
mock基本例子:
Mock.mock({
  'data|80-100': [
      {
          id: '@id',
          name: '@name',
          nicName: '@last',
          phone: /^1[345678]\d{9}$/,
          'age|11-99': 1,
          address: '@county(true)',
          isMale: '@boolean',
          email: '@email',
          createTime: '@datetime',
          avatar() {
            return Mock.Random.image('200*100', '#894FC4', '#FFF', 'png', '!')
          }
      }
  ]
})