React-08 React搭建项目
安装
yarn global add create-react-app
生成项目
yarn create react-app demo(项目名称)  # 创建一个脚手架(带hook依赖检测)
yarn create react-app demo --template typescript # 创建一个typescript的react脚手架
目录
在src,创建目录
assets、common、components、router
如果需要引入api,可以在common文件下面创建一个api的文件;
表单验证框架:rc-form,用法可以直接参照antd的form表单,使用方法一致;
在react中使用stylus
- 打开git bash,依次运行以下代码
git init
git add .
git commit -m 'description'
- 打开cmd运行:
npm run eject
yarn add stylus stylus-loader
注意:此时重启,可能会报错,删除node_nodules,执行yarn install重新安装所有的包重启即可;
- 到项目文件夹下,找到config --> webpack.config.js
(1)在320行左右,添加以下代码
oneOf: [
    {
        test: /\.styl$/,
        loaders: ['style-loader', 'css-loader', 'stylus-loader']
    },
    ....
]
(2)如果需要配置别名@符
// 在274行左右修改
'react-native': 'react-native-web'
'@': path.resolve(__dirname,'../src')
搭建redux + persist数据持久化 + redux-devtools扩展查看;
下载安装:
npm i redux react-redux redux-persist redux-devtools-extension redux-thunk创建store/reducers/index.js
import { combineReducers } from 'redux'
export default combineReducers({
    /*...*/
})
- 创建store/index.js
import { applyMiddleware, createStore } from 'redux'
import rootReducer from './reducers' //自动获取index.js

import thunk from 'redux-thunk' // 异步处理中间件
// 谷歌工具函数
import { composeWithDevTools } from 'redux-devtools-extension'
// 引入数据持久化
import { persistReducer, persistStore } from 'redux-persist'
import storage from 'redux-persist/lib/storage'

const rootPersistConfig = {
    key: 'root',
    storage,
    /* blacklist: [/*填入reduers/index.js里面有持久化的数据的字段key值*/] 如果reduers文件夹里面没有使用persist则可以不写blacklist   */
}

const persistedReducer = persistReducer(rootPersistConfig, rootReducer)
export const store = createStore(
    persistedReducer,
    composeWithDevTools(
        applyMiddleware(thunk)
    )
)
export const persistor = persistStore(store)
- 创建store/actions,store/action-types.js
在actions文件夹里面,导出触发的方法,在action-types.js里面管理变量名;
- 在src/index.js文件配置
import React from 'react'
import ReactDOM from 'react-dom'
import { Provider } from 'react-redux'
import { PersistGate } from 'redux-persist/integration/react'
import { store, persistor } from './store'
import App from './App'

ReactDOM.render(
    <Provider store={store}>
        <PersistGate persistor={persistor}>
            <App />
        </PersistGate>
    </Provider>,
    document.getElementById('root')
)
引入图片的两种方式
- 使用import引入
import IMG from '../...'
- 在状态机引入
state = {
    img: require('....')
}
<img src={this.state.img} />

// 也可以直接在src里面引入
<img src={require('@/assets')} />
在脚手架中修改端口号
- node_model ==> react-script ==> script ==> start.js
找到DEFAULT_PORT,并修改即可,修改了服务器需要进行重启;
- 在启动时直接修改端口启动
在package.json里面修改script-->start
"scripts":{
    "start": "set PORT=9000 && react-scripts start"
}
& 为并行执行,同时执行,
&& 为继发执行,前一个成功才执行后一个
- 直接在config.overrides.js修改
process.env.PORT = 3006
配置webpack
- 安装
yarn add react-app-rewired customize-cra -D
由于customize-cra依赖react-app-rewired,所以需要安装两个插件
官网: https://github.com/arackaf/customize-cra
也可以使用:craco;
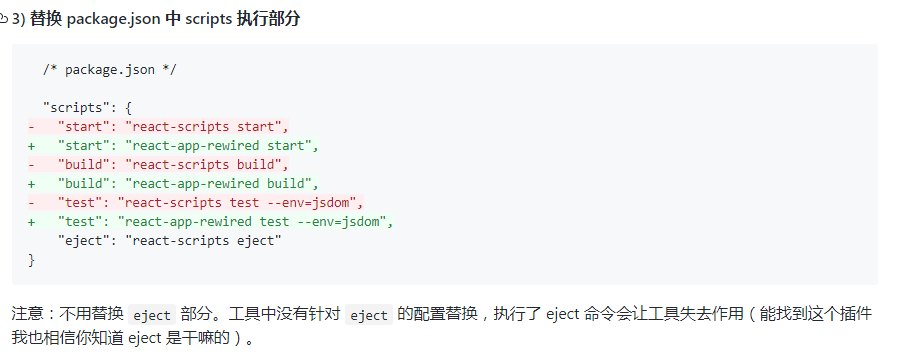
- 修改package.json
"scripts": {
    "start": "react-app-rewired start",
    "build": "react-app-rewired build",
    "test": "react-app-rewired test --env=jsdom",
    "eject": "react-scripts eject"
},
- 在项目根目录新建:config-overrides.js
const { override } = require('customize-cra');
module.exports = {};
- 添加配置,跨域设置、增加less支持、px转rem、ant-design-mobile按需加载、打包压缩js和css、关闭console
// 安装less less-loader
yarn add less less-loader -D
// 安装compression-webpack-plugin 压缩js为gzip
yarn add compression-webpack-plugin -D

const {
    override,
    overrideDevServer,
    addLessLoader,
    addPostcssPlugins,
    addWebpack
    fixBabelImports } = require('customize-cra');
const CompressionWebpackPlugin = require('compression-webpack-plugin');

// 打包配置
const addCustomize = () => config => {
  if (process.env.NODE_ENV === 'production') {
    // 关闭sourceMap
    config.devtool = false;
    // 配置打包后的文件位置
    config.output.path = __dirname + '../dist/demo/';
    config.output.publicPath = './demo';
    // 添加js打包gzip配置
    config.plugins.push(
      new CompressionWebpackPlugin({
        test: /\.js$|\.css$/,
        threshold: 1024,
      }),
    )
  }
  return config;
}

// 跨域配置
const devServerConfig = () => config => {
  return {
    ...config,
    // 服务开启gzip
    compress: true,
    proxy: {
      '/api': {
        target: 'xxx',
        changeOrigin: true,
        pathRewrite: {
          '^/api': '/api',
        },
      }
    }
  }
}

// 生产环境去除console
const dropConsole = () => {
  return config => {
    if (config.optimization.minimizer) {
      config.optimization.minimizer.forEach(minimizer => {
        if (minimizer.constructor.name === 'TerserPlugin') {
          minimizer.options.terserOptions.compress.drop_console = true
        }
      })
    }
    return config
  }
}


module.exports = {
  webpack: override(
    fixBabelImports('import', {
      libraryName: 'antd-mobile',
      style: 'css',
    }),
    dropConsole(),
    addLessLoader(),
    addPostcssPlugins([require('postcss-pxtorem')({
        rootValue: 75,
        propList: ['*'],
        minPixelValue: 2,
        selectorBlackList: ['am-']
    })]),
    addCustomize(),
  ),
  //devServer需要分开配置
  devServer: overrideDevServer(
    devServerConfig()
  )
}
- 添加webpack其他插件
const { override, addWebpackPlugin } = require('customize-cra');
const AntdDayjsWebpackPlugin = require('antd-dayjs-webpack-plugin');

module.exports = override(
    addWebpackPlugin(new AntdDayjsWebpackPlugin())
);
- 自定义override的函数
const curtomFn = () => config => {
    ...
    // 填写需要做的事情
    return config
}
module.exports = override(
    curtomFn(),  // 在里面调用一下即可
    // 还可以在函数后面调用
    (config,env) => {
        return config
    }
)
- 配置flex布局在低版本手机不兼容
直接修改package.json文件
"browserslist": {
    "defaults",
    "not ie < 11",
    "last 2 versions",
    "> 1%",
    "iOS 7",
    "last 3 iOS versions"
}
- 如果要使用类的装饰器decorators
由于是实验性功能,官方不建议使用,因此需要手动开启
npm i @babel/plugin-proposal-decorators
const { override, fixBabelImports, addLessLoader, addDecoratorsLegacy } = require('customize-cra');
module.exports = override(
    addDecoratorsLegacy()
);
配置别名
- 安装插件
yarn add react-app-rewired customize-cra - 在项目根目录创建一个config-overrides.js,用于修改默认配置;
- 代理文件路径
const { override, addWebpackAlias } = require('customize-cra')
const path = require('path')
module.exports = override(
    addWebpackAlias({
        '@': path.resolve(__dirname,'src'),
        'components': path.resolve(__dirname,'src/components'),
        'assets': path.resolve(__dirname,'src/assets')
    })  // 将常用的几个文件夹挂载;
)
打包
- 在package.json配置文件中添加一句 "homepage": ".",

- 之后运行npm run build;
添加脚手架规范文件
添加prettier
npm install --save-dev --save-exact prettier

# 创建空配置文件
echo {}> .prettierrc.json

# 创建.prettierignore,并写入配置
# Ignore artifacts:
build
coverage

# 使用以下命令格式化代码
npx prettier --write .

# 校验是否运行了prettier
npx prettier --check .
如果有eslint或其他的linter,eslint需要安装eslint-config-prettier相互配合
stylelint有类似的stylelint-config-prettier
添加eslint
npx eslint --init
关于eslint遇到的一些问题可以看:https://www.jianshu.com/p/eaa94b26cf97
添加stylelint
npm install --save-dev stylelint stylelint-config-standard stylelint-config-prettier
创建.stylelintrc.json
{
  "extends": ["stylelint-config-standard", "stylelint-config-prettier"]
}
添加commitlint
npm install --save-dev @commitlint/config-conventional @commitlint/cli

# 添加配置文件
echo "module.exports = {extends: ['@commitlint/config-conventional']}" > commitlint.config.js
添加lint-staged
npm install --save-dev lint-staged
packagejson添加Lint-staged
{
  "lint-staged": {
    "**/*.{ts,tsx}": "eslint . --cache --fix",
    "**/*.{css,less}": "stylelint --fix",
    "**/*": "prettier --write --ignore-unknown"
  }
}
添加husky
# 安装
pnpm add husky -D

# package.json添加脚本
# "prepare": "husky install"

# 运行husky安装
pnpm husky

# 创建commit-msg
npx husky add .husky/commit-msg
# 打开.husky/commit-msg,替换undefined为npx --no -- commitlint --edit "$1"

# 创建pre-commit
npx husky add .husky/pre-commit
# 打开.husky/pre-commit,替换undefined为 npx lint-staged
antd使用技巧
防止message弹窗点击一直增加
state = {timer: null}
message2 = (msg,delay) => {
    if(this.state.timer) return
    message.error(msg)
    this.state.timer = setTimeout(()=>{
        this.state.timer = null
    },delay)
}
写入内容为ReactNode的节点,可以自定义样式;
footer={[
    <div></div>,
    <div></div>
]}
react百度埋点技巧
- 创建utils/tracking.js
import { getPreHost } from '@/basic/utils';
// 判断环境, 生产环境才统计
if (getPreHost() === 'prod') {
  var _hmt = _hmt || [];
  (function() {
    var hm = document.createElement('script');
    hm.src = '';
    var s = document.getElementsByTagName('script')[0];
    s.parentNode.insertBefore(hm, s);
  })();
  // 禁止自动发送pv、uv统计, 手动去统计
  _hmt.push(['_setAutoPageview', false]);
}
- 创建完成在index.js手动引入
require('src/utils/tracking')
- 创建utils/index ,添加节流函数和百度统计方法
/**
* 节流函数
* @param {func} fn 待执行的函数体
* @param {number} timeout 控制节流时间
*/
export function throttle(fn, timeout = 300) {
  let canRun = true
  return function() {
    if (!canRun) return
    canRun = false
    setTimeout(() => {
      fn.apply(this, arguments)
      canRun = true
    }, timeout)
  }
}

/**
* 触发数据统计,在需要埋点的地方写入统计
* 百度统计文档:https://tongji.baidu.com/web/help/index?from=2
*/
export function trackData() {
  const { _hmt } = window
  if (_hmt) {
    _hmt.push(...arguments)
  }
}
- 创建Tracking.js组件
import React from 'react'
import {withRouter} from 'react-router-dom'
import {trackData} from 'src/utils'
const trackRunning = throttle(trackData, 500) // 使用节流函数, 防止页面触发多次

class Tracking extends React.Component {
    componentWillReceiveProps(next){
        trackRunning(['_trackPageview', next.location.pathname])
    }
    return () {
        return <>{this.props.children}</>
    }
}
export default withRouter(Tracking);
- 在index创建App.js时,使用Tracking.js组件进行包裹,所有代码写在该组件下面
import Tracking from './Tracking'
class App extends React.Component {
    render () {
        return (
            <Tracking>
                <div></div>
            </Tracking>
        )
    }
}
- 埋点示例
import {trackData} from 'utils'
export default function (){
    function tracking(){
        trackData(['_trackEvent', '测试百度统计', 'click', ])
    }
    return (
        <div>
            <button onClick={}>触发</button>
        </div>
    )
}
使用hooks搭建一个小型的redux
- 创建context/reducer.js
export function reducer(state, {type, ...payloads}) {
  switch(type) {
    case "SET_VALUE": return {
      ...state,
      [payloads.key]: payloads.value
    };
    case "DELETE_VALUE": {
      const curState = JSON.parse(JSON.stringify(state));
      delete curState[payloads.key];
      return curState;
    };
    default: return state;
  }
}
- 创建context/index.js
import React, { useReducer } from "react";
import reducer from "./reducer";

const initState = {}

function createBaseContext() {
  const ctx = React.createContext(undefined);
  function useBaseContext() {
    const ctxConst = React.useContext(ctx);
    if(!ctxConst)
      throw new Error("useBaseContext must be inside a Provider with a value");
    return ctxConst;
  }
  return [ctx, useBaseContext];
  // ts记得加as const保证类型
  // return [ctx, useBaseContext] as const;
}

const [Context, useBaseContext] = createBaseContext();
export function usePageContext() {
  const pageContext = useBaseContext();
  // TODO custom some
  return pageContext;
}

export function PageContext({children = null}) {
  const [state, dispatch] = useReducer(reducer, initState);
  const getValue = key => state[key];
  const setValue = (key, value) => dispatch({ type: "SET_VALUE", key, value })
  const delValue = key => dispatch({ type: "DELETE_VALUE", key })
  let ctx = {
    state,
    dispatch,
    getValue,
    setValue,
    delValue
  };
  try {
    const fatherPageCtx = usePageContext();
    if(fatherPageCtx) {
      ctx = fatherPageCtx;
      console.warn("Use father page context");
    }
  } catch (error) {}
  return <Context.Provider value={ctx}>{children}</Context.Provider>
}
- 在入口文件引入
import React from "react";
import { render } from "react-dom";
import { PageContext } from "./context";
function App() {
    return (
    	<PageContext></PageContext>
    )
}
ReactDOM.render(<App />, root)
- 使用时:
import React from "react";
import { usePageContext } from "./context";
function Person() {
    const { state }  = usePageContext();
    console.log(state);
}